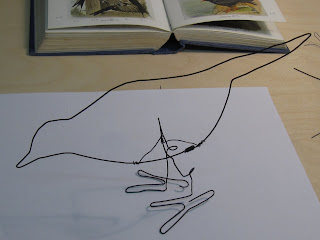
After selecting a bird to copy, we had to draw the outline in wire.
Next you join the wires using a binding action to hold each piece in place.
 |
To attach the legs to the body, I had to use some thinner wire, binding it either side of the legs, to the body, checking that they were the right height and position with the original photo of the bird. It already looks bird like by now though it is a bit unstable. The head kept plonking onto the table as if it were inebriated!
Long swooping side lines make the bird take on 3D qualities now. I added a few more lines to give it a more substantial look before choosing some scraps of fabric to bind together leaving a length of wire to attach it to the inside of the bird. I was so excited that I started a second bird which I later completed at home.
Cathy was such a delightful tutor, encouraging and helpful. I thoroughly enjoyed this workshop and intend to make many more things from wire.
My final workshop was making this bag. I will add my photos of each stage another time, but here is the finished article.I might be making some of these for my girls at Christmas time. Shhh! Don't tell them!
I can't make up my mind whether people would want to see the different stages of making on my blog or not. Let me know what you think.


Such beautiful work the weekend must've been great :)
ReplyDeleteThank you. It was really inspiring.
ReplyDeleteHello! Thanks for your kind comment at The Pea Pod. I love your wire birds and your glass pieces are lovely too xx
ReplyDeleteOooh Thank you.The birds were such fun to make.
ReplyDelete